How to Correctly Configure Ubuntu to Run Lithium PHP
April 7, 2013
I struggled for awhile to get Lithium PHP up and running and since the documentation for it isn’t the best, I thought I’d write up this little tutorial so that you don’t struggle with the same things I did.
First of all I used VirtualBox to create a brand new Ubuntu 12.10 virtual machine to set everything up. I think it is always a good idea to us a VM for anything new that you are trying so that you don’t screw anything up that you depend on on your host system.
Now that you have a fresh installation of Ubuntu let’s get started installing and configuring the necessary software required for Lithium PHP to run.
The first thing we need to do is install PHP5 and Apache:
sudo apt-get install apache2
sudo apt-get install php5
sudo apt-get install libapche2-mod-php5
sudo /etc/init.d/apache2 restart
Now we need to configure Apache. This is where I got hung up and it isn’t mentioned in the Lithium Quick Start Guide.
Use Vim to open the default config file:
sudo vim /etc/apache2/sites-available/default
I only edited line 11 in this file, everything else should stay the same. Change AllowOverride None to AllowOverride All. The file should look like this when you are done:
<VirtualHost *:80>
    ServerAdmin webmaster@localhost

    DocumentRoot /var/www
    <Directory />
            Options FollowSymLinks
            AllowOverride None
    </Directory>
    <Directory /var/www/>
            Options Indexes FollowSymLinks MultiViews
            AllowOverride All
            Order allow,deny
            allow from all
    </Directory>

    ScriptAlias /cgi-bin/ /usr/lib/cgi-bin/
    <Directory "/usr/lib/cgi-bin">
            AllowOverride None
            Options +ExecCGI -MultiViews +SymLinksIfOwnerMatch
            Order allow,deny
            Allow from all
    </Directory>

    ErrorLog ${APACHE_LOG_DIR}/error.log

    # Possible values include: debug, info, notice, warn, error, crit,
    # alert, emerg.
    LogLevel warn

    CustomLog ${APACHE_LOG_DIR}/access.log combined
</VirtualHost>
We need to enable mod_rewrite. To do this type:
sudo a2enmod rewrite
now restart apache:
sudo /etc/init.d/apache2 restart
Now let’s configure PHP to display error messages:
sudo vim /etc/php5/apache2/php.ini
Once inside of vim press the ‘/’ and type:
error_reporting
followed by the ‘enter’ key, then press the ‘n’ key. Then delete the rest of the line so that it only says:
error_reporting = E_ALL
Now scroll down around 10 or so lines and you will see
display_errors = Off
change it to be
display_errors = On
Now that we have PHP5 installed and Apache is configured correctly we can safely install Lithium PHP.
Change into the /var/www directory and run the following commands:
cd /var/www
git clone git://github.com/UnionOfRAD/framework.git my_app
cd my_app
git submodule init
git submodule update
Now we need to fix the permissions on our resources directory:
sudo chmod -R 0777 app/resources
Now we need to setup our database.
sudo mkdir /data
sudo mkdir /data/db
sudo apt-get install mongodb php-pear php5-dev
sudo pecl install mongo
sudo vim /etc/php5/apache2/php.ini
Press ‘G’ to go to the end of the file. Then Press ‘o’ to start inserting on the next line. Then Type:
extension=mongo.so
Edit the file /app/config/bootstrap/connection.php and uncomment the lines for the MongoDB Connection.
Now in your browser go to:
http://localhost/my_app
And it should look like:
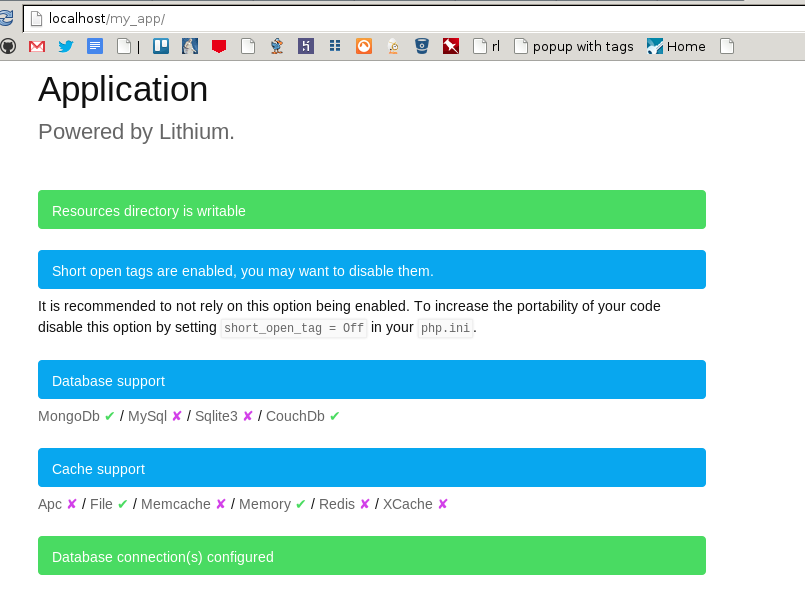
If it doesn’t, something isn’t configured right and you probably shouldn’t move forward until you get the problem resolved.
Now that we have everything set up correctly on our fresh Ubuntu installation we can now start programming! You should be able to follow the rest of the Lithium quickstart tutorial. Start with the section where it says “MVC Starts with M”.
After you create the view, you should be able to browse to
http://localhost/my_app/posts/
And you should see:

Hopefully this little tutorial helped you get started with Lithium PHP.
Here is a list of resources that helped me along the way: